Curtis.Castiglione@ROzebra.com

2018 Toyota Highlander Rear Collision & Repair Guide
If you own a 2018 Toyota Highlander and have recently been rear-ended, you might be surprised when you receive your initial insurance estimate. Often, an adjuster will write a quote for a relatively small amount, covering a plastic bumper cover and some paint. However, once the vehicle reaches a professional collision center, that bill can easily triple or quadruple.
The reason for this discrepancy lies in the difference between a visual estimate and a comprehensive repair plan. A 2018 Highlander is a sophisticated unibody SUV designed to sacrifice its own structure to protect the passengers inside. When a collision occurs, the damage rarely stops at the exterior plastic.
The Visual Estimate vs. The Supplement
Insurance adjusters often perform field inspections where they write an estimate based only on what they can see without taking the car apart. In the industry, this is known as a preliminary estimate. Because the insurance company generally pays only for proven damage, they will not include the crushed metal hiding behind your bumper until it is visible.
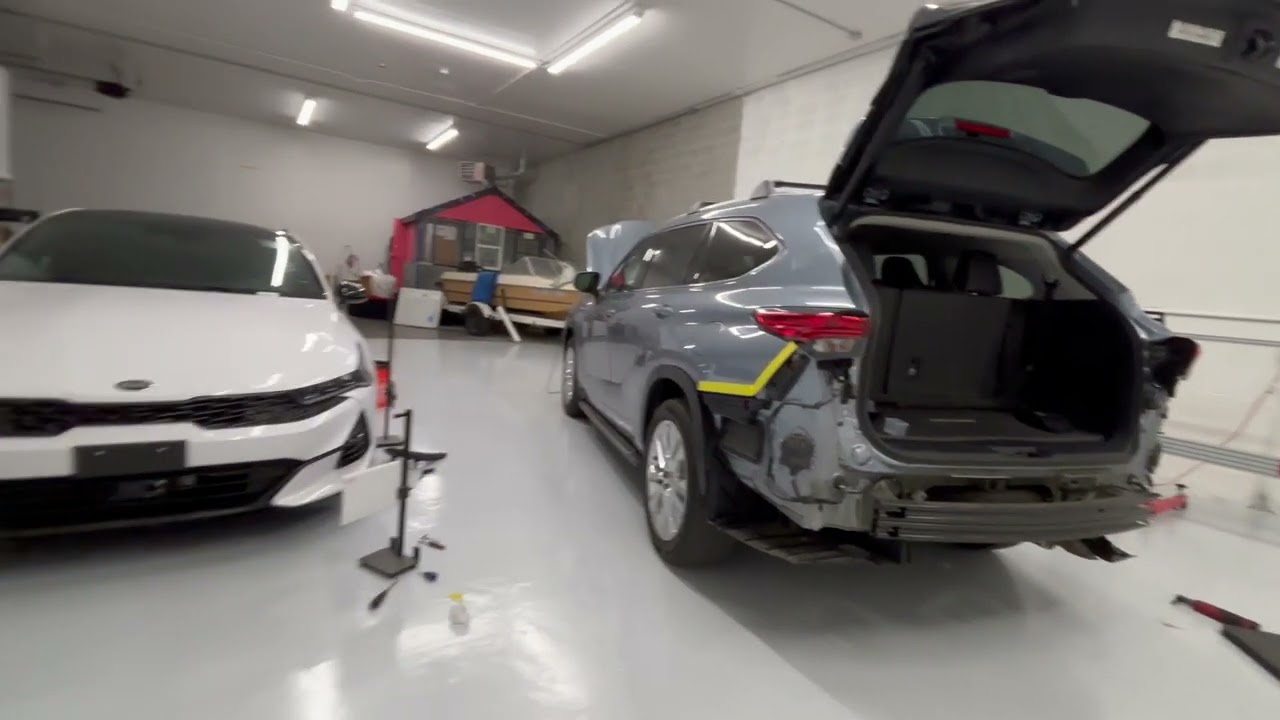
Once your vehicle is at the shop, a technician will perform a teardown. This involves removing the bumper cover, trim, and interior components to reveal the true extent of the impact. When the shop finds more damage, such as a buckled cargo floor or a bent rear body panel, they submit a supplement. This is a request for additional funds and labor time. It is a standard part of the modern repair process, not an indication that your shop is overcharging.
Hidden Structural Damage in Unibody SUVs
The 2018 Highlander uses unibody construction, where the body and the frame are one integrated unit. The rear bumper reinforcement bar—the actual metal bar behind the plastic cover—is bolted to the rear body panel and the ends of the frame rails.
In a moderate impact, the energy travels through that bar and into the cargo floor pan. Even if the exterior looks acceptable, the floor of your trunk may have buckled or developed waves. If your Highlander has an internal spare tire well, this is often the first place structural deformation appears.
Why Third-Row Seats Are a Safety Priority
One of the most critical inspection points on a Highlander is the third-row seating area. The mounting points and latches for these seats are anchored directly to the floor structure near the rear of the vehicle. If the impact was strong enough to move the rear body panel or the floor even a few millimeters, the geometry of these seat mounts can shift.
This is a significant safety risk. If a third-row seat no longer latches firmly or struggles to fold flat, it is not just a convenience issue. In a subsequent accident, a compromised latch might fail to hold the seat and the passenger in place. A shop must verify that the floor is pulled back to factory specifications so that the seat tracks and latches function exactly as Toyota intended.
Advanced Technology and ADAS Calibration
Modern bumper repairs involve more than just plastic and paint. The 2018 Highlander is packed with technology that is often damaged in rear-end collisions:
- Parking Sensors: Ultrasonic sensors in the bumper are fragile. Even if they look intact, the plastic clips holding them or the wiring harness behind them may be snapped.
- Blind Spot Monitoring (BSM): Many Highlanders have radar units located behind the corners of the rear bumper. A slight shift in the metal bracket can blind these sensors or cause false readings.
- Calibration: Toyota requires that these systems be calibrated after the bumper is removed and reinstalled. This ensures the sensors are aiming correctly.
Most insurance policies cover the cost of pre-repair and post-repair diagnostic scans. These tests involve plugging a computer into your vehicle to see if the collision triggered any fault codes in the safety systems.
High-Strength Steel and Repair Standards
Modern Toyotas use various grades of high-strength steel (HSS) to remain strong but lightweight. This material has strict repair versus replace rules. If a structural component is kinked, Toyota's repair manual often mandates a full replacement rather than straightening it with heat.
Using heat on high-strength steel can change its molecular structure, making it brittle. If a shop ignores these Original Equipment Manufacturer (OEM) procedures, the vehicle may not perform correctly in a future crash. Always ask your repairer if they are following the Toyota Body Repair Manual for your specific VIN.
Preventing Long-Term Water and Corrosion Issues
The rear body of your SUV is held together by welds and protected by industrial seam sealers. A collision can pop these seals, creating microscopic gaps. If these seals are not properly inspected and replaced, rain or road spray will leak into the cargo area. This leads to mold, ruined carpets, and eventually, the corrosion of expensive electrical connectors. A quality repair must include a leak test to ensure the liftgate and rear body seams are completely watertight.
Important Questions for Your Repair Facility
Before you authorize repairs or pick up your vehicle, you should act as your own advocate. Ask the following questions:
- Did you perform a full teardown to inspect the cargo floor and rear body panel for hidden buckles?
- Were the third-row seat mounting points and latches checked for alignment and functionality?
- Did the repair require structural pulling, and if so, did you follow Toyota's specific repair procedures?
- Were the parking sensors and cameras calibrated after the bumper was reinstalled?
- Did you perform a water-leak test on the rear body seams and liftgate seals?
- Is there a post-repair diagnostic report showing that all electronic systems are clear of faults?
While your insurance policy generally covers the cost to restore the vehicle to pre-loss condition, the definition of that condition can vary. Most policies allow for the use of alternative parts, such as aftermarket or recycled components, unless you have a specific OEM parts rider. However, for structural components like the cargo floor, many professionals recommend new OEM parts to ensure the metal reacts correctly in a subsequent crash.
Disclaimer: Insurance policies and state laws vary. Always review your specific policy and consult with a qualified collision professional or your insurance representative regarding coverage and repair requirements.



No Comments Yet
Be the first to comment on this article.